Showing posts with label entrelac. Show all posts

Thursday, June 14, 2012

Entrelac Revisited

A while ago I did a tutorial on entrelac, a great way to knit a modular-type of garment with blocks of alternating colors. Now I decided it was time to do a tutorial on entrelac in the round.When working entrelac in the round you're basically just excluding the side triangle, which may be a godsend for some. Entrelac is definitely easier when worked in the round. But, I recommend everyone learn entrelac flat first.

It might seem counter intuitive, but when you learn how to knit entrelac flat, and then learn it in the round it will just feel like doing it a little differently. If you learn in the round first, and then decide you also want to learn how to work it flat, it will feel totally alien and be extremely confusing.

Materials: I'm using US size 8 Takumi Clover needles, with a 12 inch cable. The size of you needle and cable really depends on your yarn, and the pattern. My yarn is a cream and light pink color of Berella's "4" yarn.

Step 1: Cast on a multiple of 8 stitches to fill up your needle. The blocks and base triangles we'll be working, just like my flat tutorial, will be worked over 8 stitches. It provides a nice even number that's not too large, but not so small that the slipped stitch edges are hard to identify.


We're going to be working the base triangles identically to how you work the base triangles in a flat piece of entrelac. If you're working on an entrelac hat, you will probably have done a set number of ribbed rounds or something similar. I'm just picking up and just knitting the entrelac.


Step 2: Building the Base Triangles 

1. Knit 1 stitch
2. Turn your work around, and purl the stitch you just knit.

Note: Some patterns and instructions on entrelac will slip the first stitch of each row, including this very first stitch. I personally do not do this because I've found that knitting the first stitch provides a more "stable" triangle for me, after knitting it once I slip purlwise for the rest of the triangle. If you want to slip this stitch and then purl, that's fine too. 


3. Turn work. Slip 1 stitch, knit 1 stitch.
4. Turn work, purl back to start. (By start, I mean back to the start of this base triangle, or, in other words, back to the first original stitch that you're slipping.)
5. Turn work, slip 1 stitch, knit 2 stitches.
6. Turn work, purl back to start.
7. Turn work, slip 1 stitch, knit 3 stitches.
8. Turn work, purl back to start.
9. Turn work, slip 1 stitch, knit 4 stitches.

Continue in this way, adding 1 more stitch of the set 8 every time you turn to knit. Once you have 8 stitches on the right hand needle, you will stop. Do not turn and purl.

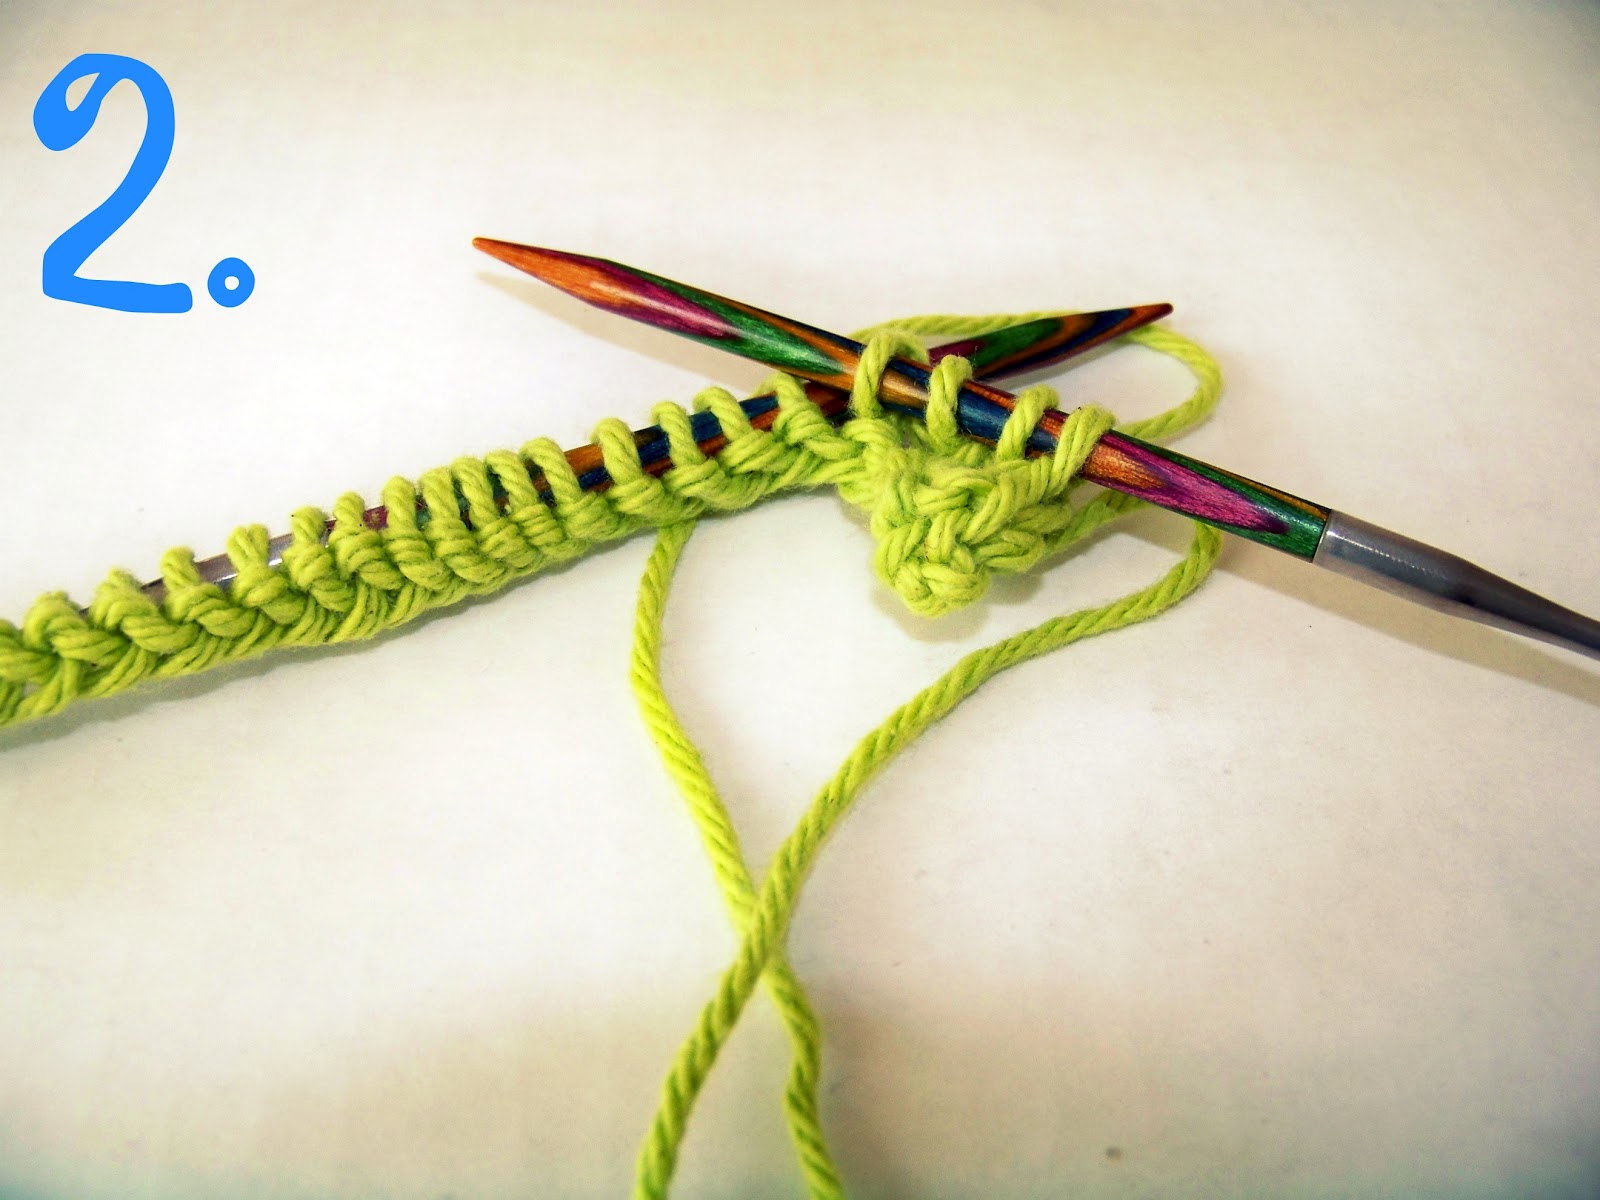
You're now done with that base triangle, and you will just pretend for the time being that it doesn't exist anymore. Begin the next triangle on the next set of 8 stitches in the same way as above.

Continue your way around the needle, picking up the 8 stitches of each base triangle.


At this point it looks like you have an awkward, mushy crown on your needles. Now we're basically going to be filling the little loops formed between each of the triangles with the right slanting diamonds. 


Step 2: The Right Slanting Diamonds 

Like I said, there are no side triangles in entrelac worked in the round! Yay! We just get to move on to the central diamonds.

This first diamond might throw you off, it's a rebel without a cause, and it wants to be different than all the other diamonds, it wants to be special. The first diamond will be picked up with the right side facing you. All the other diamonds will be picked up with the wrong side facing you, and there's a special maneuver to begin the other diamonds as well, but we'll worry about that later.

Because you've been slipping the first stitch purlwise, you should have a very neat little edge of "v's" to pick up from.


You'll be inserting your needles between each of the "legs" of this v, and picking up a new stitch with your alternating color. In this case, that's white. 


As I said, you'll be picking up from the front for this diamond. Insert the right hand needle into the "v" at the base of the last triangle (the one you just finished knitting), with alternating color behind, loop and pull the new white stitch onto the left hand needle. Continue this way, picking up a total of 8 stitches. Now it's time to begin forming the first diamond.


Row 1: Purl 7, purl the last white stitch, p2tog (1 white and 1 pink) together
Row 2: Turn and knit across the 8 stitches.
Row 3: Turn, slip 1 stitch, purl 6, p2tog
Row 4: Turn and a knit 8.

You'll keep working this way until the pink stitches (or whatever color you're using) are decreased away. Once you have purled the final pink stitch with the white stitch, you will stop. Don't knit back across. It's time to pick up 8 new stitches.

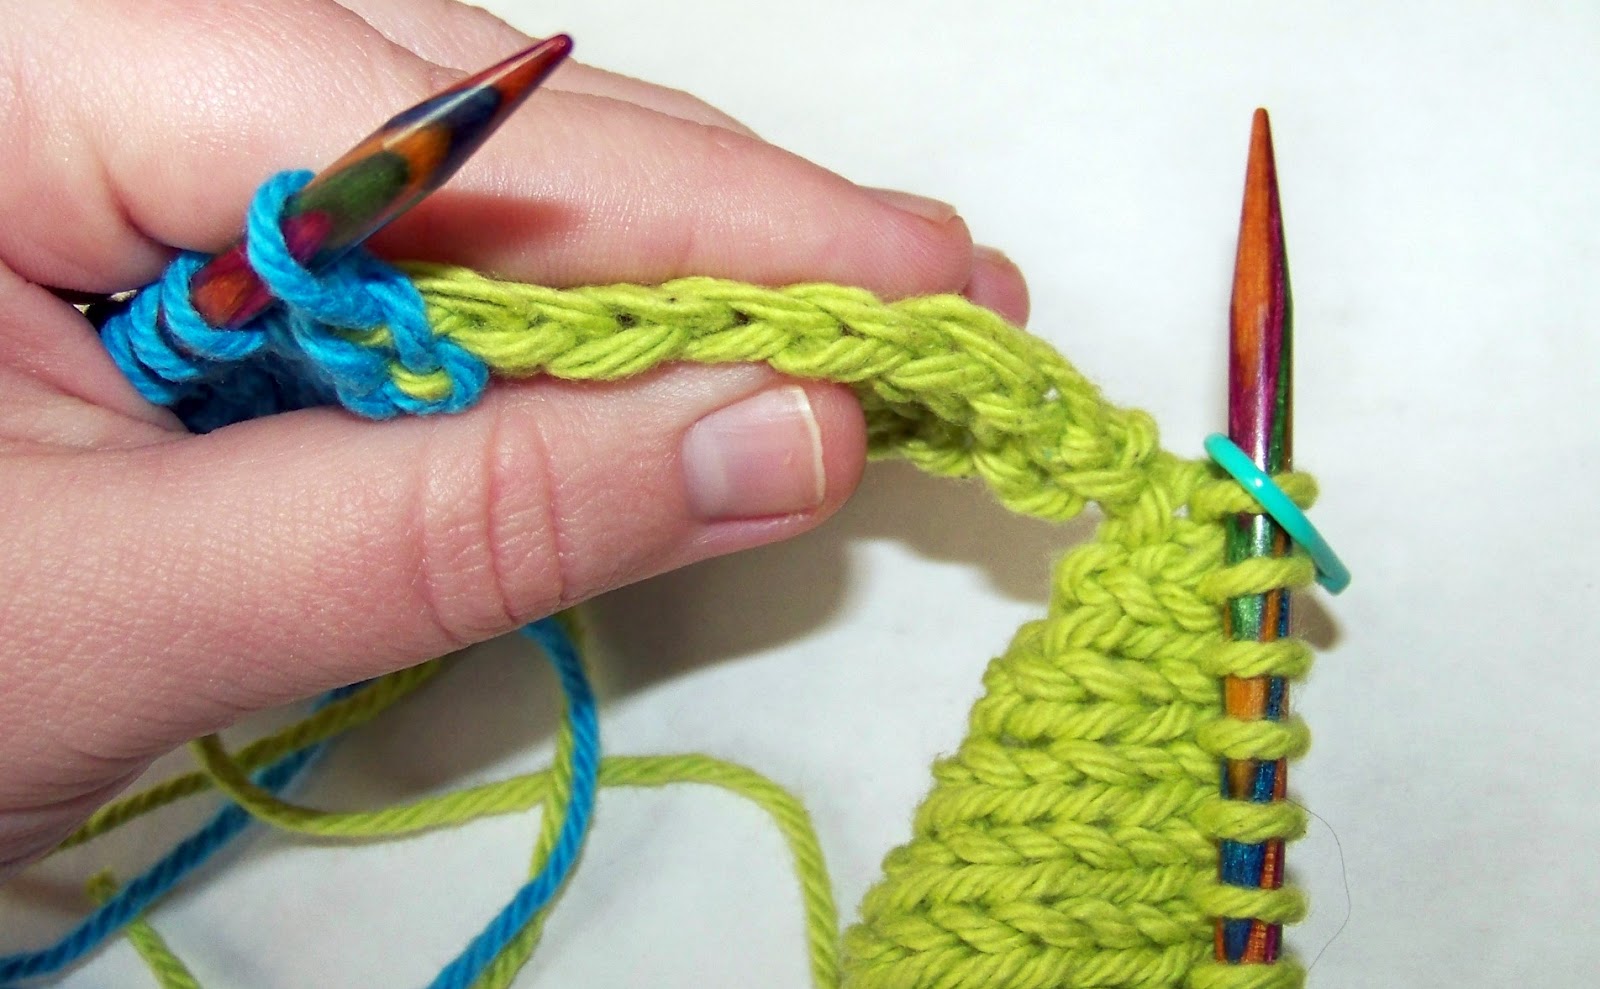
This time, and for all the rest of the diamonds this round, you'll be picking up with the wrong side facing you.

To begin, yarn back and insert you right hand needle into the first slipped stitch and pull yarn through. (If you're having trouble, this is shown on my original entrelac tutorial, located here: Entrelac Part 1 and Entrelac Part 2) Pick up a total of 8 stitches.

Now bring your yarn back to the front, and slip the last white stitch you just picked up onto your left hand needle, and purl it together with the first pink stitch.

Row 1: Turn, knit 8 stitches.
Row 2: Turn, purl 7, p2tog.
Row 3: Turn, knit 8 stitches.
Row 4: Turn, purl 7, p2tog.

Just as before, continue this until all your pink stitches are gone, on the last p2tog do not turn and knit, just pick up 8 more stitches and do it all again.


That's it for now, folks! The rest of the tutorial, for the left slanting diamonds and the ending triangles should be in tomorrow! If you have any questions, email me at Ashley.mishmoshcrafting@gmail.com 

Also - if you like my tutorials, maybe you'd like to donate a dollar (or more!) for my little yarn fund (which doubles as my Addi needles fund, sigh, maybe someday), which of course will be used for more tutorials! Donate Here

No pressure of course, everything here will remain free.

Edit: I would like to put a very special thank you out to Kay Green for being my first donation. I really appreciate it, thank you for the very special night. 

Wednesday, March 21, 2012

Entrelac: Parts 2.5 - 5

In our last post we left off on entrelac with our base triangles, and our left side triangle, and two left slanting central diamonds. Now we're going to pick up and knit a right side triangle, and two right slanting diamonds.

By the way, if you've gotten to this point, I'm willing to bet you're really starting to 'get' entrelac. Congrats :)

Part 3: Right Side Triangle

We're now going to have to pick up stitches in the right edge of the last base triangle. As usual, 8 of them.


Now this one gets a little confusing, because we're not going to touch those stitches past the marker in this picture, the live stitches for our central diamond. We're going to be decreasing the stitches we just picked up down to 1. Here we go:

1. Knit 7, slip the last stitch purlwise. Turn.
2. Purl to the last two stitches, purl these 2 together. Turn.
3. Knit 6, slip the last stitch. Turn.
4. Purl to the last two stitches, purl them together. Turn.

Continue working this way, until you have one remaining stitch, ending on a purl 2 together. This remaining stitch will serve as the first 'picked up stitch' in our next part.

 Part 4: 3 (Left Slanting) Central Diamonds

As I said, the first stitch is the last remaining stitch from our left side triangle, this is for our first left slanting diamond only. The other two will be the regular 8.

1.Cut a nice little tail, and pick up your contrast color, and pick up 7 (2nd & 3rd diamond: 8) stitches in the edge.


2. Slip the last picked up stitch onto the left needle, and ssk (slip 1 knitwise, slip another one knitwise, and knit together.) This time we're using the ssk so that the green stitches lay over the blue, creating a clean edge for diamonds of the fabric.

3. Purl across, turn.
4. Slip 1, knit to the last stitch, ssk again. Turn.


Continue in this way until all the blue stitches are gone, and you will end, as usual, on the last ssk. From there you will be ready to repeat the above steps to pick up 8 more stitches, and complete two more left slanting diamonds, for 3 in total. Remember, in the next  two diamonds you will be picking up 8 complete stitches, not 7 as before.

And there you have it! To continue after this, you will mosey back on over to my last post, Part 2: The Left Triangle working through up until this point, until you're reached your desired length.

Part 5: The Bind Off

Now, for the sake of a nice even piece of entrelac you want to bind off when you have this:

As you can see, we have a left side triangle, 2 right slanting diamonds, and a right side triangle. Now you're ready to begin binding off. 

1.Just as before, the last stitch on the right side triangle will serve as the first picked up stitch. Pick up 7 stitches on the inside of the right side triangle. As above slip the last stitch of the picked up stitches on to your left hand needle, ssk. (Slip slip knit) 

2.Purl Across.
3. K2tog, knit to last stitch, ssk. 
4. Purl Across.
5. K2tog, knit to last stitch, ssk.

We're working to decrease one green stitch, and one blue stitch, in the same row, and just purling on the reverse. 

You will do this until you have two green stitches, and one blue stitch. From here you will slip the first stitch, ssk the last green and blue stitch together, and then pass your first slipped stitch over the stitch you just ssk'ed. 

So: Slip 1, ssk, psso (pass slipped stitch over)

You will have one stitch on your needle, this will be the first stitch of your picked up stitches. So you will again pick up 7 stitches, and follow the directions above two more times. Every time you will have one stitch left on the needle. On the last one, cut yarn and pull through. 


And, by dern, you did it! See, I told you, it isn't that hard. If you have any problems, any questions at all, please feel free to email me at:  ashley.mishmoshcrafting@gmail.com

Now, go brag about yourself to your friends and loved ones.

Tuesday, March 20, 2012

Entrelac: Parts 1 - 2.5


I've been on and off with my fascination with modular knitting in the last couple of years. I have months where it's all that sits upon my needles, and then months where I forget about it for the classics and lace work.

Now, I don't want to confuse anyone, entrelac and modular knitting are two separate entities. But if you're anything like me - starting with entrelac is the best way to introduce yourself to modular knitting. It gets you familiar with working entirely separate pieces of knitting, all on the same solid piece of growing work. In the beginning, it will make your brain hurt. It will make you want to rip all the stitches out, yell, and go crochet your heart out to spite the world of two needle crafts.

Have faith, oh grasshopper, it will come to you. And you know, anger will only lead to the darkside. That's bad ju-ju.So, I thought I would add a little tutorial of my own, to help those struggling with entrelac work through it. So, put 'yer thinkin' caps on! And grab two colors of yarn, and some size 8 needles.


Part 1: The Base Triangles

We have to start our entrelac with three base triangles. Well, three in this case, it ranges for every pattern. But three is the number I need for my pot holder pattern. This tutorial is not for in the round entrelac, just flat work. I will make a subsequent in the round post later. :)

Cast on 24 stitches, loosely. I used the long tail cast on, but nearly any 'stretchy' cast on will work just fine. I used a size US 8 needle. You will want to continue working a little more loosely than normal, it will help hide the picked up stitches.


Now, here comes the tricky part. But it's not really tricky.

1. Knit 1 stitch, turn. By turn I mean switch your right hand needle to your left hand, and likewise. So your work is literally turned around.
2. Purl the stitch you just knit.
3. Slip 1 stitch, and knit 1 stitch (adding a stitch), and turn.
4. Purl across.
5. Slip 1 stitch, knit to last stitch, and knit one more from the left hand needle, again adding a stitch.
6. Purl across.

Edit: I had some questions here as to why I knit the very first stitch the first time, rather than slipping it. I choose to knit that stitch to add more stability to the base of my piece. This prevents the top from being more firm than the bottom. I hope that makes sense. Questions are always welcome! :)


Continue to work in this fashion, adding one stitch to your needle with every knit row, until you reach your goal number, in this case that is 8 stitches, by adding one of the existing stitches each knit row. And turning after that addition to purl across. We're slipping the first stitch so we have a nice neat visual of where we will be picking stitches up later on. In the picture above, we have 4 stitches cast on, and you can see the growing base triangle forming from the turning.

Oh no! Did you lose count of how many stitches you've added? Well, it's okay. When you turn your work back around after the purl row, you will see a clear indication of where you left off by the gap. Shown here:


There's a pretty clear little "hole" you can see, so we have 6 stitches on, and two more to add.

When you reach your goal number of stitches, do not turn and purl across. You will stop right there, and begin the next triangle in the same way as the first. Working until you have 8 stitches of that set.
One triangle, done, again, no turning, you want the "right side" of your fabric facing you, working yarn behind. Now, go back to the start and make two more triangles, ignoring the finished ones.

We now have three finished triangles. I placed stitch markers so you can easily see the three separate triangles, you don't have to use them. Now I know these look pretty wonky, but it will all start making sense soon.

Now we're going to move to the next step - 'filling in' our empty spot, and placing the side triangles, to even it all out.

Part 2: The Left Side Triangle & 2 Central Diamonds

So we're looking at what we ended with in step 4 of part one, and it looks a little crazy. If you're using two colors, cut a three or so inch long tail, and pick up your second color.

1. Purl into the first stitch with new color, turn and knit front and back (kfb), adding a stitch in the new color.


2. Purl 1, purl 2 stitches (green and blue) together. Turn.


3. Knit front and back, slip 1 purlwise. Turn.
4. Purl to last 'new colored' stitch, and p2tog. Turn.
5. Knit to the last two stitches, kfb, slip 1 purlwise.


Essentially, we're slowly eating away those green stitches, by combining them with our new blue stitches. Keep moving along in this way until all of your green stitches are gone, knitting front and back on the second to last stitch on your knit row, and you have 8 blue stitches. Do not turn on the last p2tog, you want the 'wrong side' facing you for the next step.

You should end up with a little something like this:


The 'live' original green stitches are now the underside of the side triangle.

Part 2.5: 2 Central Diamonds

Now we're going to build two central diamonds. 

Above, you were slipping the last knit stitches purlwise, this leaves us with a nice edge to pick up our diamonds from. 

1. Pick up 8 stitches, purlwise, along the edge of the first triangle.


2. Grab the last picked up stitch, and place it on your left hand needle, from there purl this picked up stitch and first green stitch together.

A note on picking up: I feel terrible, because I feel I've caused some confusion. When you're picking up a stitch, if your right side of the work is facing you, you'd pick up just like if you were to knit across, yarn in the back. And if the wrong side is facing you, you'd pick up as if you were purling across, the yarn will be in the front. 

3. Turn and knit 7, slip 1 purlwise. Turn.
4. Purl across to the last blue stitch, and purl 2 stitches together.
5. Turn and knit 7, slip the last stitch purlwise.

Like usual, continue doing this all the way across, until you're all the way across your green stitches. (Or, whatever color you're using.) You'll have this:


After the last purl 2 together do not turn your work. Start at the beginning of part 2.5, picking up the edge stitches on the middle triangle, just as you did for the first. Working across in the same way.


Tune in tomorrow, for the rest of my entrelac tutorial.