Knitting in the round is a technique that often scares new knitters, or even seasoned knitters who have just avoided doing it. But knitting in the round is much easier than it appears, and it's a lot of fun when you get the hang of it. One of the best perks of knitting in the round is - get this - no purling to create perfect stockinette stitch. Purling of course can be used to change texture, and just add a border other than stockinette.
Knitting in the round is definitely intimidating at first, but if you just follow along below, take breathers and make sure not to get ahead of yourself, or expect perfection on your first go at it, you'll be fine. :) I promise.
Now, there are two popular ways of knitting in the round: Magic Loop, and Double Pointed Needles. Some use both techniques, and some are loyal to one or another. I am a sucker for magic loop, I find that overall my work goes more quickly, and there's a ton less "laddering" in the work. Laddering occurs when you're not knitting tight enough over the needle change offs and you get, as the name suggests, little ladders between your work.
In this post, I'll be covering working on double pointed needles. Double pointed needles are a bit "fiddly" at first, but don't let that scare you away, it always feels like that and it's totally normal. Once you get in a few rounds, it will start to feel a whole lot more stable.
Okay, here goes:
Let's pretend we have a pattern, and it calls to cast on 20 stitches. Grab your dpn's, and cast on 20 stitches to a needle.




Knitting in the round is definitely intimidating at first, but if you just follow along below, take breathers and make sure not to get ahead of yourself, or expect perfection on your first go at it, you'll be fine. :) I promise.
Now, there are two popular ways of knitting in the round: Magic Loop, and Double Pointed Needles. Some use both techniques, and some are loyal to one or another. I am a sucker for magic loop, I find that overall my work goes more quickly, and there's a ton less "laddering" in the work. Laddering occurs when you're not knitting tight enough over the needle change offs and you get, as the name suggests, little ladders between your work.
In this post, I'll be covering working on double pointed needles. Double pointed needles are a bit "fiddly" at first, but don't let that scare you away, it always feels like that and it's totally normal. Once you get in a few rounds, it will start to feel a whole lot more stable.
Okay, here goes:
Let's pretend we have a pattern, and it calls to cast on 20 stitches. Grab your dpn's, and cast on 20 stitches to a needle.

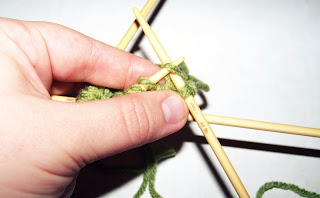
So now we've got 20 stitches on our needle. The set of dpn's I'm using is a set of four, some come in sets of four, others in five and so on. Do your best to distribute the stitches among the needles evenly, just slip them onto their respective needle as if to knit. I have 6 stitches on two needles, and 8 on the last.

As the picture shows, the tail end of the yarn, and the working end, are on the needle on the right. We're going to be working on the left hand needle. Where the working yarn leaves off indicates where you begin, laying the needles flat helps you find where they naturally fall more easily, which is the needle to left. To make sure you're not twisting stitches, you can align all the knots of the cast on edge in towards each other, if you look at the picture you'll see what I mean. When I start the first round, I pick up tail yarn and knit it into the first two stitches, for a snug connection. This is my preference, it's not necessary.

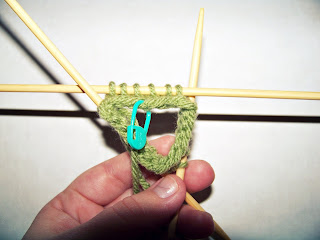
Just start working on that first row. It helps to just pretend that those other two needles don't even exist, you don't need them right now, just focus on the two in your hands. Once you complete that needle, just move to the next as you just did with the first needle, all the way around.

I place a marker on the last needle that completes the round, so the third. So I know, when I finish this work on this needle, I've completed a round.
As I mentioned earlier, some have problems with laddering. Laddering looks a little something like this:

This happens when your dpn's meet, and you're not knitting that stitch quite tight enough. This can be avoided a couple of ways:
1.) Make sure you're knitting the first stitch on each needle a little tighter than normal.
2.) You can switch where the stitches are, so that no two stitches are always the beginning stitch. You can do this by slipping stitches between needles. But this can be a pain in the bum. Usually just making sure you're giving the first stitch some special attention helps just fine. But with lace yarn, it may be best to move the stitch around. I find I have much more of a problem with laddering the finer the yarn I use.

And there you have it! You just keep working around like this, and you will get a tube. Knitting in the round is a wonderful skill to have. In a later post I'll be discussing Magic Loop, and even knitting with two circular needles.
Hope to see you there!
Having trouble? Need a video? Here's a great Youtube link:
And as always, if you have questions, shoot me an email, I'm here for you! ashley.mishmoshcrafting@gmail.com
Allonsy!


