 | |
| I bought these each for a whopping .29 cents at my local Michaels. |
Wednesday, May 30, 2012
Sneak Peek :: {Laugh, Live, Love}
I'm doing a quick sneak peek into what I'm working on. It's in the beginning stages of what I'm doing, so I can't give it all away. I think this might be the toughest craft I'll do all summer.
Here's a peek. Now, here's what I can give away. I'll be busy with artist tape and two shades of brown spray paint. :)
Absence Makes the Heart Grow Fonder, Right?
Have I really been gone for over a week?!
Sorry guys, life has been busy. With a military husband to spoil over Memorial Day weekend I had my hands full.
But I do have good news - my knitting mojo has returned! What a glorious thing it is. I'm currently working on a version of Pumpkinbelle's cowl, located here: http://pumpkinbelleknitsandbits.blogspot.com/2011/05/grey-loop.html
I'm switching it up a little bit, and I'll be sure to share my changes with you. I'm also working on some patterns of my very own, like a hat, and.. well, mostly hats. I love lacey head-wear this time of year.
I did accomplish one goal I've been putting off this weekend - working with polymer clay.

How was everyone's long weekend? How do you dress your knitting up?
Sorry guys, life has been busy. With a military husband to spoil over Memorial Day weekend I had my hands full.
But I do have good news - my knitting mojo has returned! What a glorious thing it is. I'm currently working on a version of Pumpkinbelle's cowl, located here: http://pumpkinbelleknitsandbits.blogspot.com/2011/05/grey-loop.html
I'm switching it up a little bit, and I'll be sure to share my changes with you. I'm also working on some patterns of my very own, like a hat, and.. well, mostly hats. I love lacey head-wear this time of year.
I did accomplish one goal I've been putting off this weekend - working with polymer clay.
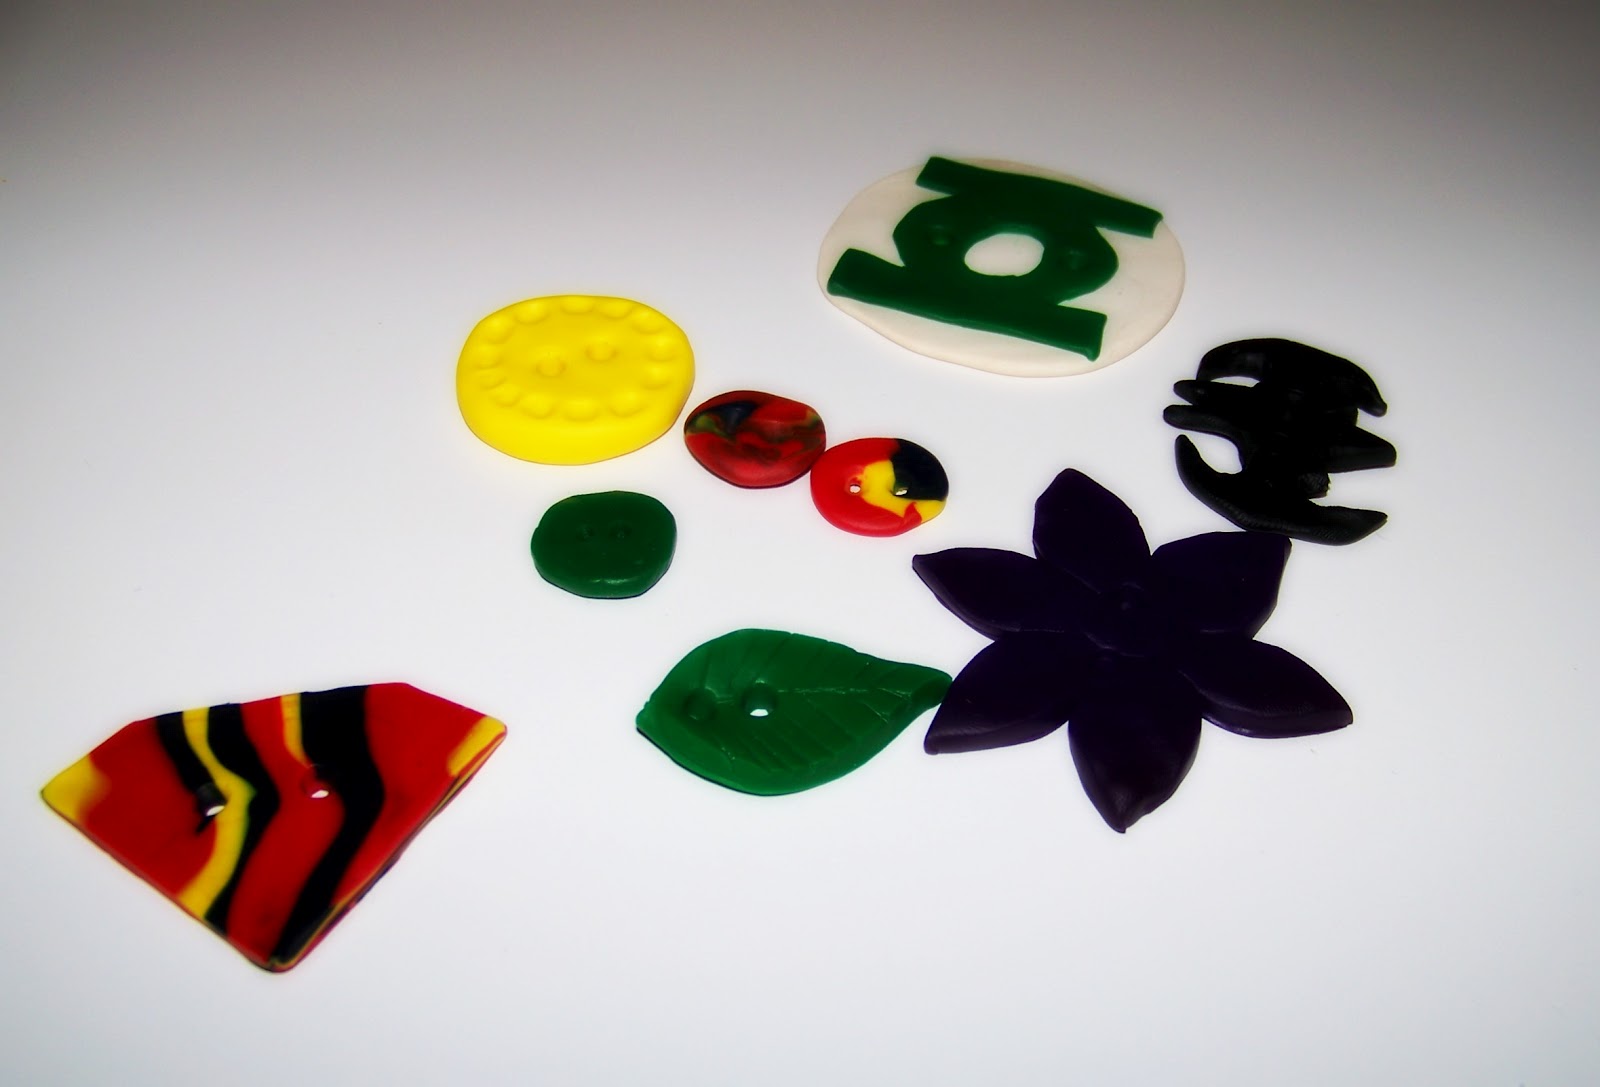
I mostly wanted to get into working with polymer clay to make buttons for my knitting. And that's exactly what these lil' beauties will be used for. I even got my husband to help make them with me, and while we're not professionals yet, I think we did pretty alright for a couple of first timers.
How was everyone's long weekend? How do you dress your knitting up?
Tuesday, May 22, 2012
Make It Yourself (Recipe) Monday!
My husband and I recently started hitting the gym vigilantly. At least three times a week we head on in, and two times a week I try and do an at home workout as well. And I've even started incorporating a healthy menu that both of us can accept.
Anyone knows, when starting a workout/weight loss plan you're told by everyone and their 4th cousin twice removed that you have to eat breakfast. I am not a breakfast person. That's right, I said it. I don't like eggs, I don't eat any pork product (and haven't for years), and oatmeal is the epitome of gross to me.
My mother tried and tried all my formidable years to get something in me before school. I was unrelenting. Especially because it was not uncommon for breakfast to make me feel physically ill for the first 4 -5 hours of the day. Who wants that?
Now I'm 23, married, and thousands of miles from home. I find myself forcing my husband to eat breakfast for his health and still not doing it myself, oh the irony!
I'm a big fan of meal replacement shakes, so I always have whey protein in the house. I don't like going through the trouble of making a big lunch if my husband isn't home, and often make green smoothies.
Today, I think I have finally found the cures to my morning blues. Iced Vanilla Protein Latte.
Don't rub your eyes, or try to adjust your t.v. set, you saw this right. Low calorie, high protein, and high energy breakfast latte that you don't have to feel bad about all day. And who doesn't like lattes? I just don't like paying 5 dollars for one, and then thinking about all the calories.

What You'll Need:
3/4ths a cup of prepared coffee, I used Seattle's Best Number 4 (my personal favorite)
1/2 cup fat free milk
1 scoop vanilla protein powder
Ice
Throw the first three ingredients into a blender, or a shaker bottle, and blend 'em up. Then grab a handful of ice and pour your delicious latte over, enjoy.

After all is said and done, your latte only has 2.5 grams of fat, 30 awesome grams of filling, muscle repairing protein, and is under 200 calories.
What tips and tricks do you guys use when trying to lose weight and improve your lifestyle?
Sunday, May 20, 2012
Knitter's Block
Anyone who knits for a period of time understands the frustration of Knitter's Block. You search through pages and pages of Ravelry pictures, hoping for one of the thumbnails to jump out at you, inspire you, and launch you into a fury of needles and yarn - ending with a final beautiful project. But this doesn't happen. You cease to be inspired. You feel as if your mojo has abandoned you. Your needles lay dormant, your stashed untouched. The world is cold, and lonely, devoid of the warmth of your 100% baby alpaca lace weight sock yarn.
Maybe that last part is an exaggeration.
Regardless, this is where I am with my knitting at the moment. I was incredibly inspired by the thoughts of recycling everyday items that no longer had a use into yarn, and making wonderful home decor with them, ie the t-shirt pillow and the sheet bowl. Once I completed these projects, I just failed to have anything jump out at me and inspire me. It might be the changing seasons, it's hard to justify knitting scarves and hats in the middle of a 105 degree Las Vegas summer, or it's just a plain lack of motivation.
I keep starting projects. Having hope for them, and then ripping them from my needles, and tossing the yarn back into the ol' stash bin. So, I started doing the thing that typically remedies these moments for me - knitting dish cloths. I posted about this awhile back, and linked to a pattern I really like: Instant Knit-ification
At the moment, this is exactly what I've been knitting this week. Wash cloths. So many cloths. I purchased a large cone of cotton yarn, aptly named "Ivy League," by Peaches n' Cream. I actually settled on the yarn, because the other cones available were all bubblegum pink, or a crazy purple color. My kitchen has a lot of blue and greens, so it worked. Now I'm really in love with the yarn, and I enjoy how the greens and blues snake across the knitting, reminiscent of ivy.

The pattern for the finished cloth shown on the corner of my wash cloth bin is located here: Modified Feathers and Fan Cloth. The original pattern, from Dishcloth Boutique, is here: Feathers and Fan Cloth, I followed this pattern for the cloth shown in the Ivy League yarn.

I also stumbled upon this pattern, thanks to Ravelry, Picot Swirl Cloth, which I love. I always had an affinity for round cloths, and thought the only way to really make one was to crochet. Boy, am I glad I was wrong. At first glance, the pattern seems intimidating - but it's really not, just give it a chance. Also, when stitching it up at the end, don't try using Kitchener stitch, you'll want to use the shoulder seam technique. There are directions for this seam here: Shoulder Seam Instructions.
How do you guys pass the time when you hit your own knitter's block? Is there a go-to garment you whip up?
Tuesday, May 15, 2012
T-shirt Yarn!
I love recycling, especially when I can use to add a little punch to my home. Last week I went on a midday rendezvous to Goodwill, where I picked up three men's XL t-shirt, with the sole intention to turn them into some awesome, affordable, bulky yarn for a project I had had in mind for several months, my Kilgore Pillow.
This project was also inspired by the awesome things located on the Pickles site. I can't seem to tear myself away from all their inspiring ideas. And Spring has put a real itch in me to switch up my homes' decor, and I can never justify spending much money to myself - especially when there are so many DIY ideas.
The pattern for my pillow itself is for sale, for $1.50, so if you'd like please visit my Crafty page: Kilgore Pillow Pattern. So you, too can get your hands on the pattern! :)
Now for making that t-shirt yarn. It's very similar to the sheet yarn tutorial I had posted earlier, and I had even more fun making it. Of course, you will need a t-shirt that you're willing to mortally wound, because you're going to basically eviscerate the poor thing - as far as t-shirt go.


5. When you have finished cutting diagonally, you get to grab your new yarn, and pull it between your hands, so that the raw edges will effortlessly roll into themselves and create a real purdy piece of yarn!

This project was also inspired by the awesome things located on the Pickles site. I can't seem to tear myself away from all their inspiring ideas. And Spring has put a real itch in me to switch up my homes' decor, and I can never justify spending much money to myself - especially when there are so many DIY ideas.
The pattern for my pillow itself is for sale, for $1.50, so if you'd like please visit my Crafty page: Kilgore Pillow Pattern. So you, too can get your hands on the pattern! :)
Now for making that t-shirt yarn. It's very similar to the sheet yarn tutorial I had posted earlier, and I had even more fun making it. Of course, you will need a t-shirt that you're willing to mortally wound, because you're going to basically eviscerate the poor thing - as far as t-shirt go.

1. Cut the hem of the shirt off, and throw that junker away. Then you'll cut straight across at the arms. You can discard the top portion, or keep it for spare rags, whatever your recycling-little-heart desires.

2. Now you'll turn it sideways, basically, so that you can hang it off your arm through the big ol' hole, hopefully that makes sense. Fold the bottom portion in half twice, leaving a 1 inch "backbone" at the top of the two folds.

3. Start cuttin'! I wasn't very stringent with the sizes of my strips (1 - 1.5 inches), life is just better when you live on the edge like that, except don't ever listen to me about not gauging your projects. This dirty habit gets me in a lot of trouble. Stop cutting at that one inch backbone you created, don't cut through!

4. Once you have finished all your strips, you get to unfold and free the crazy mess of t-shirt you now have. Find that backbone, and grab your scissors. You will want to gut diagonally across the backbone, so you're not separating any strips from each other. If you cut straight across you'll wind up with a ton of circles.


Yay! T-shirt yarn! As I mentioned earlier, I used my t-shirt yarn to make my Kilgore Pillow, which you can see below, the link will bring you to my craftsy page.
 |
| Kilgore Pillow |
The t-shirt yarn made a very good substitute for those pricey superbulky yarns, and it works even better for an item in your home that will get lots of use - like a pillow. I hope that you have fun making yourself up some t-shirt yarn, and if you happen to purchase my pattern I would like to say a huge thank you! And please share your finished projects!
As always, I'm here to answer your questions! Feel free to ask anything.
Allonsy!
Friday, May 4, 2012
Puff Bowl-y
I've been pretty fascinated and inspired with stuff like this lately:
But, if you mosey on over to the yarn section, prepare yourself for a heart attack. The yarn to make one of these bad boys is nearly $100 a skein. And it's recommended to have 2 skeins. I understand, it's a 500 g ball, but even if I did have the money, I don't think I'd ever spend $100 a skein on a yarn. I love cascade, and merino, but not that much.
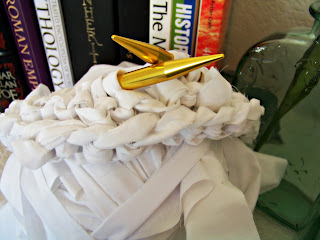
So, in comes solution numero dos, and a mighty fine solution if I do say so myself. What is it, you say? Well, it's quite simple really - unwanted t-shirts, bed sheets, anything like that. In this tutorial, we're using a bed sheet. With that sheet, I made the soft basket you see below. Perfect for a kitchen, bathroom, even a baby's room (no sharp corners!) this basket is pretty versatile, and a quick knit.

So, when trying to take pictures for the sheet tutorial, I found that was easier said than done, thanks to the size of the sheet. So here is a masterful illustration instead!


But, if you mosey on over to the yarn section, prepare yourself for a heart attack. The yarn to make one of these bad boys is nearly $100 a skein. And it's recommended to have 2 skeins. I understand, it's a 500 g ball, but even if I did have the money, I don't think I'd ever spend $100 a skein on a yarn. I love cascade, and merino, but not that much.
So, in comes solution numero dos, and a mighty fine solution if I do say so myself. What is it, you say? Well, it's quite simple really - unwanted t-shirts, bed sheets, anything like that. In this tutorial, we're using a bed sheet. With that sheet, I made the soft basket you see below. Perfect for a kitchen, bathroom, even a baby's room (no sharp corners!) this basket is pretty versatile, and a quick knit.


Yeah, I know, it's pretty impressive. As you can see, you will fold the sheet in half lengthwise, and cut ALMOST through, my strips were about an inch wide. There's no need to stress too much over the size, though. I had places where the strips were very thin and it all worked itself out. Once you've done that as many times as needed, you will unfold the sheet and snip where the red lines are, if you did it right you will have a long thread of sheet to knit with.


With the sheet yarn, cast on 40 stitches onto size 15 circular needles (you'll need two sets later), I used a 16 inch cable to connect, but it could have been longer.
Row 1: Knit
Row 2: Purl
Repeat until your bowl is your desired depth. Now for the decreases, here's where you will want to switch off to using two circular needles.
Note: The k2tog can be very difficult with the sheet, you can also sl1 k1 psso, but stick with one decrease or the other.
On an odd (KNIT) row, k4 k2tog
Purl for all even rows
k3 k2tog
Purl
k2 k2tog
Purl
k1 k2tog
Purl
k2tog, work yarn through the remaining stitches and pull tightly. Weave in the ends the best you can. I snipped the end strand sideways, so it would thread through my tapestry needle.
There you have it! Your sheet bowl is complete, feel free to wash on gentle cycle.


As usual, with patterns, feel free to make as many as you wish, gift as many you want, and you can even sell your finished item. But please, don't steal my pattern. And if you do make it, please share pictures with me! I'll feature you!
Allonsy!
Edit:
I've had some notes on not understanding how to make the yarn. Here's a video courtesy of Youtube that may help you.
This video does it differently than I did, she is joining the strips of yarn after completely removing them from one another. This is a fine way to do it! I just choose to do it differently, and save some time. I failed to find a video of someone doing it the way I illustrated.
As always, feel free to email me with any questions, and I'll do my best to get right back with you: Ashley.mishmoshcrafting@gmail.com
Wednesday, May 2, 2012
An Excuse for Me to Drink Frappucinos!
If I didn't mention it in my "About Me" section, I L-O-V-E coffee. Starbucks, Biggby (a Michigan-based company), & out of the home coffee pot, doesn't matter! Since the city I live in, doesn't have a Starbucks in for about 15 miles, I resort to buying their Frappucino's from the gas station. I know it's not the same as having one in a cup and made in front of me, but it does the trick until the next time I have a craving for a real one.
However, at one point I was drinking a lot of the glass jar ones. What to do with those cute jars?
UPCYCLE!
In picture three, I mentioned that I used the Folk Art Enamels Paint. I did it wayyyy different than it's suggested you use. I had a brilliant idea of using it on the INSIDE of the jar instead of the outside. It was a lot more difficult than I expected, but it turned out the way I wanted it. You can't tell from the pictures, but there are some air bubbles. The way the light hits it, looks pretty cool. It's suggested you air dry it for 21 days, I did 14.
The ribbon around the neck was a bit difficult, too. The stinkin' ribbon wouldn't stay put, so I had to layer up & ended it with a small dab of Tacky Glue.
Thoughts?
However, at one point I was drinking a lot of the glass jar ones. What to do with those cute jars?
UPCYCLE!
 |
| One empty Frappucino jar + some Goo Gone (to remove the label) |
 |
| Add four daisy stems from Michaels. |
 |
| I used Folk Art Enamels Paint (Frost White) to get the jar white. Wrapped some dark plum ribbon around the neck to add a different color. |
 |
The ribbon around the neck was a bit difficult, too. The stinkin' ribbon wouldn't stay put, so I had to layer up & ended it with a small dab of Tacky Glue.
Thoughts?
Subscribe to:
Posts (Atom)