Showing posts with label do it yourself. Show all posts

Thursday, January 31, 2013

Duplicate Stitch How-To

I'm back! And this time I'm getting back into the swing of this whole tutorial thing.

I frequently use duplicate stitch in my knitting. I use it to reinforce any seaming I do, and to reinforce thumbs on gloves and mittens, it's also a good alternative for new knitters who are still scared to attempt other colorwork methods, like Fair Isle or intarsia, to put a design on a piece of knitting after it's completed. Duplicate stitch isn't difficult, all you'll need is your project, a tapestry needle, and a similar weight of contrasting yarn. Duplicate stitch, in my experience, only works on stockinette pieces of knitting. When you're looking at stockinette stitch, you'll see that the individual stitches look like little tiny "v's."


You'll need a contrasting yarn, or the same color of yarn if you're reinforcing a seam or area of your knitting. It's important that the two yarns are the same weight, otherwise the constrasting yarn will bulge, or it won't cover the underlying stitches completely. If you don't have two yarns of the same brand or weight, you can substitute certain yarns. For example, if you're working with worsted weight yarn, you can use a double strand of DK yarn to duplicate stitch.


1. Thread a tapestry needle with contrasting yarn. (Don't thread too much onto the needle, it's better to have a few more tails to weave in when finished than pulling feet and feet of yarn through your work, and having a tangled mess on the wrong side of the fabric.) Insert the needle into the base of a stitch, right where the two legs meet at the bottom of the "v." Pull the yarn through, leaving a 6 inch or so long tail. 


2. Now insert your tapestry needle into both legs of the stitch above the stitch you originally pulled your constrasting yarn through. Pull the yarn through the two legs, but not too tightly. Just as with knitting, you'll find a tension that works for you with practice of this technique, like Ma' always said "Practice makes perfect." And something about patience, what was that again?


3. Re-insert your needle right back into the base of the stitch that you originally started in, and now you'll see how the contrasting yarn rests right over the two legs of the stitch, effectively masking the original color. I like to think of it like I'm drawing an upside down triangle over the stitch, using the legs of the stitch about it. 


In the end, you should have something that looks like the picture above, neat little duplicate stitches square over your original work. Experiment with this technique to create beautiful motifs, or finished objects that will withstand the forces of nature. 

As always, if you have any questions, would like a PDF version of this tutorial, or have any requests you can contact me at Ashley.Mishmoshcrafting@gmail.com 

Allonsy! 


Friday, May 4, 2012

Puff Bowl-y

I've been pretty fascinated and inspired with stuff like this lately:


But, if you mosey on over to the yarn section, prepare yourself for a heart attack. The yarn to make one of these bad boys is nearly $100 a skein. And it's recommended to have 2 skeins. I understand, it's a 500 g ball, but even if I did have the money, I don't think I'd ever spend $100 a skein on a yarn. I love cascade, and merino, but not that much.

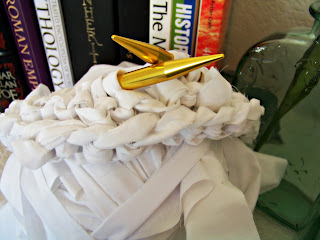
So, in comes solution numero dos, and a mighty fine solution if I do say so myself. What is it, you say? Well, it's quite simple really - unwanted t-shirts, bed sheets, anything like that. In this tutorial, we're using a bed sheet. With that sheet, I made the soft basket you see below. Perfect for a kitchen, bathroom, even a baby's room (no sharp corners!) this basket is pretty versatile, and a quick knit.


So, when trying to take pictures for the sheet tutorial, I found that was easier said than done, thanks to the size of the sheet. So here is a masterful illustration instead!

Yeah, I know, it's pretty impressive. As you can see, you will fold the sheet in half lengthwise, and cut ALMOST through, my strips were about an inch wide. There's no need to stress too much over the size, though. I had places where the strips were very thin and it all worked itself out. Once you've done that as many times as needed, you will unfold the sheet and snip where the red lines are, if you did it right you will have a long thread of sheet to knit with. 


With the sheet yarn, cast on 40 stitches onto size 15 circular needles (you'll need two sets later), I used a 16 inch cable to connect, but it could have been longer.

Row 1: Knit 
Row 2: Purl 

Repeat until your bowl is your desired depth. Now for the decreases, here's where you will want to switch off to using two circular needles. 

Note: The k2tog can be very difficult with the sheet, you can also sl1 k1 psso, but stick with one decrease or the other. 

On an odd (KNIT) row, k4 k2tog
Purl for all even rows 
k3 k2tog 
Purl 
k2 k2tog 
Purl 
k1 k2tog 
Purl 
k2tog, work yarn through the remaining stitches and pull tightly. Weave in the ends the best you can. I snipped the end strand sideways, so it would thread through my tapestry needle. 

There you have it! Your sheet bowl is complete, feel free to wash on gentle cycle. 


As usual, with patterns, feel free to make as many as you wish, gift as many you want, and you can even sell your finished item. But please, don't steal my pattern. And if you do make it, please share pictures with me! I'll feature you! 

Allonsy

Edit: 

I've had some notes on not understanding how to make the yarn. Here's a video courtesy of Youtube that may help you. 


This video does it differently than I did, she is joining the strips of yarn after completely removing them from one another. This is a fine way to do it! I just choose to do it differently, and save some time. I failed to find a video of someone doing it the way I illustrated. 

As always, feel free to email me with any questions, and I'll do my best to get right back with you: Ashley.mishmoshcrafting@gmail.com